
The “right-hand rule” is a valuable tool in physics to help you determine the direction of vectors and fields. When you use the right-hand rule properly, your work is a lot easier. In this post, I describe a number of right-hand rules and show you how to apply them. But first, a warning:
Never, ever use a left-hand rule!
You may already know that one use of the right-hand rule is to find the direction of the force on a positively charged particle. If you want to know the direction of the force on a negatively charged particle, you use the right-hand rule and then reverse the direction you obtain. Almost every year, I get a student who comes up with the clever idea to use a left-hand rule on negative particles. Does this work? Absolutely! So why is it a bad idea? Because once you’ve used the left-hand rule, you’ve created a muscle memory that says it is okay. And the next time you need to use a right-hand rule, you may pick up your left hand without even thinking about it and you will get the wrong result. (This is particularly true if you are right handed—you already have a pencil in your right hand, so it seems perfectly natural to use your free hand.) You won’t even realize you got the wrong answer. When I teach students the right-hand rule for the first time, I train them to sit on their left hands so they won’t be tempted to use them by mistake. After 10 or 20 times using the right-hand rule, you’ll develop a muscle memory that says “only the right hand will do” and you will be less likely to make this mistake.
- Cross products: When you find the cross product of two vectors, the result is perpendicular to each of the original vectors. But does the resultant vector point “above” the plane of the two vectors or “below” the plane? Use the right-hand rule to determine the direction of this vector. There are a number of ways to implement this right-hand rule. I’ve seen textbooks that teach you to imagine an arrow coming out of your palm. My dad learned to contort his fingers like this, with his thumb up, his index finger pointing out and his middle finger pointing perpendicular to his palm:

He taught this method to me, but I think it’s hard to remember which finger goes with which vector.
Here’s the technique I think works best: Let’s say you want to find the direction of 


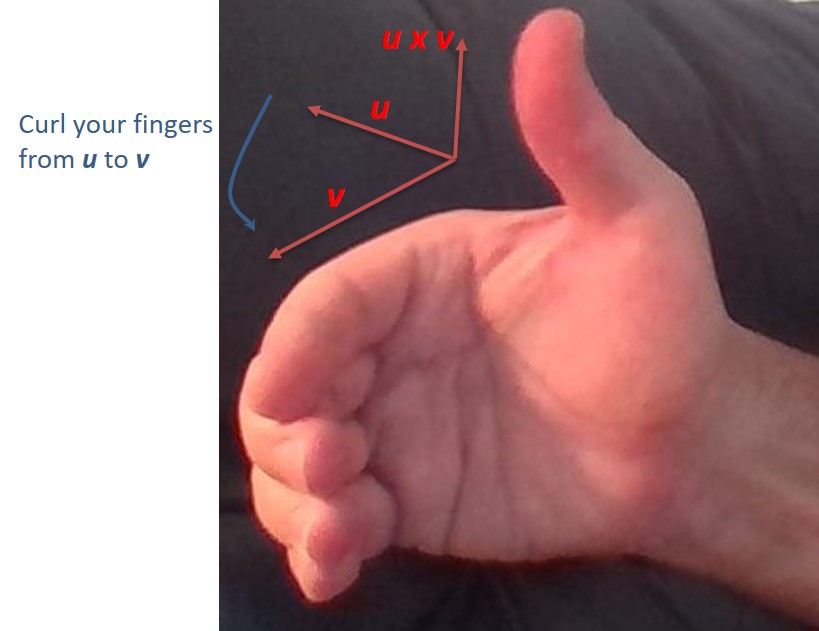
Here are some vector products where you can use the right-hand rule to determine the direction of the vector product:


Use this same rule when you are constructing coordinate axes in space. Use the rule to point the three positive axes in the correct direction given that

- Magnetic field due to the current in a wire: When a current travels through a wire, it generates magnetic field lines that form concentric circles around the wire. But does the magnetic field point clockwise or counterclockwise? Use the right-hand rule to determine the direction of the field. Grip the wire with your right hand so that your thumb points in the direction of the (conventional) current. Then your fingers curl around the wire in the direction of the field. If the wire is bent into a loop, this same method tells you which direction through the loop the field points.
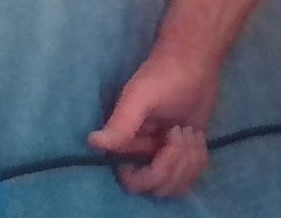 In this photo, the current is moving to the left. Point your thumb to the left, and you see the field lines are moving down behind the wire and are moving up in front of the wire.
- Lenz’ law: When a loop of wire is placed in a location where the magnetic flux is changing, a current is induced in the wire. But in which direction is the induced current? Use a right-hand rule to determine the direction of the current. First determine the direction of the induced magnetic field predicted by Lenz’ law. If the flux is increasing through the loop the induced magnetic field has to point in the direction opposite the flux. If the flux is decreasing, the induced field points in the same direction as the flux. Now wrap your fingers around the wire so that they are pointing in the direction of this induced flux. Your thumb points in the direction of the induced current. Note that this right-hand rule is essentially the reverse of the previous rule.
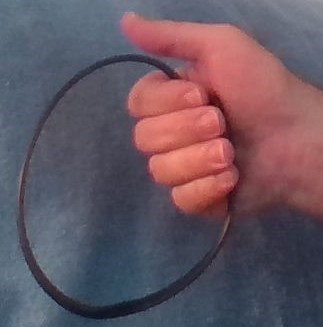 In this photo, we have determined the induced flux must point out of the page towards our point of view. We curl our fingers to show this direction and we see the induced emf and induced current will be counterclockwise.
- Ampere’s law: The loop integral
around an Amperian loop is proportional to the net current through the loop. But in which direction through the loop is the current positive? Use a right-hand rule to determine the direction of positive current. Curl your fingers around the loop in the direction of integration. Your thumb points in the direction of positive current.
 around an Amperian loop is proportional to the net current through the loop. But in which direction through the loop is the current positive? Use a right-hand rule to determine the direction of positive current. Curl your fingers around the loop in the direction of integration. Your thumb points in the direction of positive current.
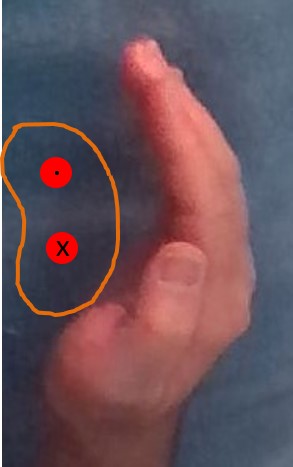
Our Amperian loop is shown in orange in this photo. The two red circles represent current-carrying wires. The top wire has current coming out of the page and the bottom wire has current flowing into the page. We choose to integrate in a counterclockwise direction. Curl your fingers in that direction and your thumb points out of the page (towards your point of view). Therefore the top wire will be assigned a positive current and the bottom wire will be assigned a negative current in order to apply Ampere’s law.